
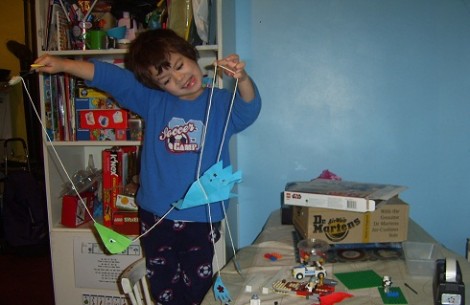
 A few weeks before Christmas I took my son to a craft workshop at the Young Vic theatre in London where we made marionette style bird puppets. My son loves his. The puppet hangs from the shelves you can see behind him, and comes out mostly to play the part of giant bird monsters - in this instance to chase off the T-Rex in the game he was playing with his Lego Star Wars figures!
And then this morning he decided he wanted to make another one so we could put on a show! It is the photos from the second one that you'll mostly see here as they show the puppet being made more clearly than the photos I took at the workshop.
What you'll need for this project:
- 1 sheet of A3 paper (fairly stiff)
- sticky tape
- string
- a stick
- scissors
- stuff for decorating the bird
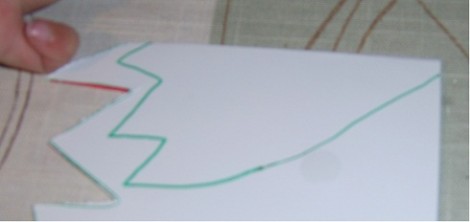
 Fold the paper in half. Draw a shape for the birds body from one corner, as you can see in this photo. It can be any shape - ours is smooth but it could be wavy or spiky or whatever you like. Just keep one end thin and pointy for the neck, and the other end large and bulbous.
On the other corner, draw the head (below). A similar shape, with the pointy bit in the top edge to make the beak, and a bulbous shape to the rest. Also draw two feet on what is left of the paper.
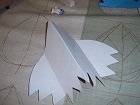
Take the body, which you'll have cut out. There will be the fold down the middle. You also want to fold up (that is fold the opposite way to the fold in the middle) a wing on either side of the body (see below right).
Now is a good time to decorate the bird. We glued on 'feathers' to this one. These were made using scissors that cut in squiggles, and cutting out bits from left over paper hats I'd saved from Christmas crackers. I thought that the extra crepe paper might come in useful for something! On the original bird, which was made with coloured paper, my son decorated it with sparkly star stickers glued on shiny bits and bobs.
Once that's all done, it is time to string the marionette together. Turn the body over. Get one longish piece of string - this will be the loop that is held in one hand to operate the body of the puppet. Tape down one end of the string to the underside of a wing tip, and the other end to the underside of the other wing tip. Next tape one end of a piece of string down the centre fold underneath the birds body and the other end down the fold in under the head. This is the neck.
On the opposite side of the fold under the head, tape a longish piece of string. The other end of this is attached to the stick, which will control the other end of the bird. The feet are attached to the underside of the body. You should be able to see what I mean in the photo below.

And you're done! I'll let you know how our show turns out. Since the script is being written by a five year old I suspect it will involve being chased by lots of sharp toothed dinosaurs. Please let me know if you make one of these - I'd love to know how it turns out!


Comments